Cauliflower Grits with Spicy Shrimp

May 11th, 2020 by Debbie Martilotta

Ingredients

Cauliflower Grits

  • 1 cup unsweetened cashew milkor coconut milk or grass-fed whole dairy milk
  • 1 tablespoon unsalted grass-fed butteror ghee
  • ¼ cup unsalted chicken stockor vegetable stock
  • ¼ teaspoon kosher salt
  • ¼ cup grated organic sharp cheddar cheese

Shrimp

  • 1 pound shrimppeeled and deveined, 16/20 count
  • ¼ teaspoon kosher saltdivided
  •  teaspoon black pepper
  •  teaspoon cayenne pepper
  •  teaspoon paprika
  • 4 slices nitrate free baconthick-cut, chopped into ½-inch pieces
  • 1 tablespoon minced garlicabout 4 cloves
  • ¼ cup yellow oniondiced into ¼-inch cubes
  • ¼ cup red bell pepperdiced into ¼-inch cubes
  • 2 tablespoons olive oilto substitute bacon grease if desired
  • 4 teaspoons lemon juice
  • ¼ cup green onionsthinly sliced

Greens

  • 8 ounces Swiss chardsliced into 1-inch strips

Instructions

Cauliflower Grits

  1. Grate or add cauliflower florets to a food processor. You want the cauliflower to be about the size of rice grains. See the video linked here.
  2. Add cauliflower to a medium-sized saute pan and cook over medium-high heat for about 5 minutes, constantly stirring to release some moisture from the vegetable.
  3. Add one tablespoon of butter, ¼ cup of cashew milk, ¼ cup of chicken stock, and ¼ teaspoon salt. Stir and cook until moisture gets absorbed and cauliflower cooks through about 5 minutes.
  4. Using an immersion hand blender or blender, pulse cauliflower mixture until it resembles the texture of grits (smooth yet still grainy). You don’t want the mixture to be completely smooth.
  5. Transfer back to the pan. Turn heat to medium and add in ¼ cup grated cheese, stir until melted. Slowly add about ½ to ¾ cup more cashew milk until the grits are smooth and creamy. Taste and season with more salt and pepper as desired. Keep warm over very low heat while making the shrimp.

Spicy Shrimp

  1. In a medium-sized bowl combine shrimp, ¼ teaspoon salt, ⅛ teaspoon pepper, ⅛ teaspoon cayenne pepper, and ⅛ teaspoon paprika. Set aside. You can add more cayenne pepper if you like it really spicy.
  2. Heat a large saute pan over medium-high heat. Add diced bacon and cook until crispy, frequently stirring about 6 minutes. Transfer to a paper towel and drain. Keep 2 tablespoons of bacon grease in the pan, or you can remove and use 2 tablespoons of olive oil instead.
  3. Heat pan to medium and add garlic and onion, stir and cook for 1 minute until fragrant. Add in the bell peppers and cook for 1 minute.
  4. Turn heat to medium-high and add shrimp. Cook for 2 minutes on one side, and 1 minute on the other until pink. Add in 4 teaspoons of lemon juice, 2 tablespoons green onions, and cooked bacon. Stir to combine, cook for about 1 minute. Transfer shrimp to a warm bowl.

Greens

  1. In the same pan add the swiss chard. Cook on medium-high heat until wilted and tender, about 3 to 4 minutes. Season with salt and pepper.

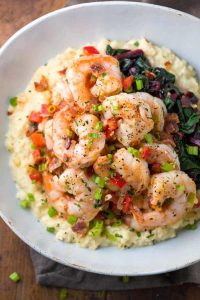
To Serve: Stir and reheat grits if needed. Divide grits, greens, and shrimp evenly among serving bowls.

by Jessica Gavin


How Much Protein Should I Eat Daily For Weight Loss?

February 5th, 2020 by Debbie Martilotta

Decades of scientific research on weight loss have uncovered a few key pieces of information on what helps people successfully win the battle of the bulge.
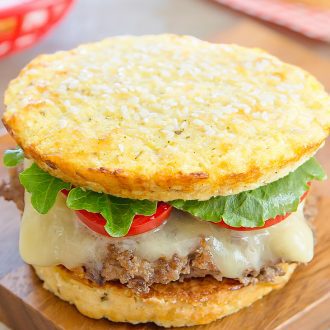
  • First, we know that while exercise is important, a person’s healthy eating habits likely matters more for weight loss than the hours they spend in the gym.
  • Second, when it comes to dieting, there is no single best one for losing weight; many diets can work quite well as long as total calorie balance is accounted for.
  • Third, dietary protein is one of the key “levers” in a diet that increases the likelihood of someone’s ability to lose weight.

This article is going to cut through a lot of the noise surrounding protein and tell you how much protein you should be eating to lose weight and some of the things you should consider when planning your diet.

WHAT IS PROTEIN?
Protein is an important macronutrient that is involved in nearly all bodily functions and processes. It plays a key role in exercise recovery and is an essential dietary nutrient for healthy living. Protein and amino acids are primarily used to create bodily tissues, form enzymes, and cellular transporters, maintain fluid balance, and more.

HOW MUCH PROTEIN PER DAY TO LOSE WEIGHT?
If you want to lose weight, aim for a daily protein intake between .73 and 1 grams per pound. Athletes and heavy exercisers should consume 1-1.5 grams per pound if aiming for weight loss.

WHAT ARE THE BENEFITS OF PROTEIN IN WEIGHT LOSS?
Dietary protein can be an important part of a diet that is intended for weight loss. While there are many benefits to dietary protein, there are four main areas that have direct effects on weight loss:

  • Satiety
  • Lean mass
  • Thermic effect of food
  • Storage as body fat

Let us take a deeper dive into each of these topics.

PROTEIN HELPS YOU FEEL FULL LONGER
One of the biggest things that impede weight loss is hunger.

People are far less likely to stick with a nutrition or diet plan if they experience high levels of hunger.

Protein is the most satiating of all the macronutrients.

Several different lines of research have all pointed to the same thing: higher protein intakes tend to provide more satiety and less hunger.

For example, in one study, high protein snacks allowed people to go longer between eating and also caused them to eat less at subsequent meals.

Another study showed that including protein into a glass of water decreased hunger compared to water alone.

Depending on the source of protein, there does appear to be minor differences in the exact amount of satiety that protein provides, however these differences are minor and don’t really make a meaningful impact for most people.

Currently, there is no consensus on the optimal level of daily protein intake in one’s diet with regard to staying full. However, roughly .82-1.32 grams of protein per pound appear to provide substantial benefit on satiety.

PROTEIN PRESERVES LEAN BODY MASS
In addition, protein has another benefit on weight loss: it helps preserve lean body mass during periods of caloric restriction.

One study compared the effect of low protein intake (1.0 grams per kilogram per day) to high protein intake (2.3 g/kg per day) on lean body mass over a short term caloric deficit. On average, the low protein group lost about 1.6 kilograms (3.5 pounds) of muscle mass while the high protein group only lost 0.3 kg (0.66 pounds) of muscle mass.

Currently, most evidence suggests that .73 grams of protein per pound are a recommended daily target for protein intake to spare lean body mass loss during periods of weight loss.

PROTEIN INCREASES THE THERMIC EFFECT OF FOOD
The thermic effect of food is the “cost” of digesting your food.

Essentially, it takes some energy to break food down, digest it, and turn it into energy. Protein has the highest “cost” of all three macronutrients.

While the total effect that the thermic effect of food has on daily energy expenditure and weight loss is small, it is not meaningless and is important to note.

In one study, a high protein diet increased the thermic effect of food by roughly 6-8 kcals per hour when compared to a low protein diet, which may translate to ~50-75 calories per day.

However, not all studies show this large of an effect, and the thermic effect of protein is not likely responsible for most of its benefit, but it may be the “cherry on top” of adequate dietary protein during weight loss.

PROTEIN IS HARD TO STORE AS BODY FAT
During periods of weight loss, there are often times where more energy is consumed than expended. As such, minimizing how much of that excess energy (i.e. calories) is stored as fat is important.

The body processes the three different macronutrients (i.e. proteins, carbohydrates, and fats) in very different ways.

Leaving out a lot of jargon and mumbo jumbo, in order for protein to be stored as fat, it goes through a much different biochemical process than either carbohydrates or fats.

This process makes it much harder for protein to store as body fat.

One study found that protein is stored as body fat with roughly 66% efficiency, while carbohydrates store with 80% efficiency and fats store at 96% efficiency.

During weight loss, overeating protein results in much less stored body fat than overeating on carbohydrates or fat.

While many different diets can be successful for weight loss, the protein content of a diet is one of the important factors to consider when planning a diet. Protein has been shown to promote satiety, help maintain lean body mass, increase the thermic effect of food slightly, and can reduce how efficient the body is at storing extra calories as body fat.

Courtesy of NASM.org


Cauliflower Bread Buns

May 22nd, 2019 by Debbie Martilotta
  • 3 cups finely riced raw cauliflower florets
  • 2 large eggs
  • 1/2 cup shredded parmesan cheese
  •  2 tbsp almond flour
  •  2 tbsp coconut flour
  •  1/2 tsp baking powder
  •  1/2 tsp dry Italian seasoning herb blend
  •  1 tsp white sesame seeds

Directions:

  1. Preheat oven to 400°F. In a large bowl, combine cauliflower, eggs, cheese, almond flour, coconut flour, baking powder, Italian seasoning. Mix with a large spoon until everything is thoroughly mixed. The mixture should be wet but not liquid.

  2. Grease the cavities of a muffin top pan. If you don’t own a muffin top pan, you can also make free-form buns on a baking sheet lined with parchment paper or a silicone baking mat.
  3. Measure out 1/2 cup lightly packed cauliflower mix. Dump onto muffin mold or onto a baking sheet and press down on the middle with the palm of your hand. If you are using muffin top pan, evenly spread the cauliflower across the mold and compact it down slightly with your knuckles or fingers so that the crumbs of the bread will be tight. If using a baking sheet, press down on the mixture with the palm of your hand and then spread and shape to form a round disc 4 inches wide and slightly more than 1/2 inch high. Compact down the cauliflower mixture gently with your fingers or knuckles so that the crumbs of the cauliflower buns will be tight. Sprinkle tops of bread buns with sesame seeds.
  4. Bake for 20-25 minutes or until tops are golden and cauliflower buns are completely cooked. Use a thin spatula to gently loosen the bottoms of the cauliflower buns and allow to cool slightly before eating.

Courtesy of Kirbies Cravings


Pizza Stuffed Chicken Breast

March 27th, 2019 by Debbie Martilotta

Ingredients

  • 3 piece chicken breast, pounded out to 1/4 inch
  • 1/2 cup “clean” marinara sauce
  • 3 oz pepperoni
  • 3 tbsp black olives, sliced
  • 1 cup spinach
  • 3 oz fat-free organic mozzarella cheese
  • ½ cup fresh basil leaves
  • salt and pepper to taste

Directions

1. Butterfly the chicken breast by slicing right down the middle, taking care not to cut all the way through.

2. Place the butterflied breasts between two sheets of parchment paper and hammer the chicken to about a 1/4-inch thickness.

3. Season both sides of the breast with salt and pepper. Spread marinara sauce on one side of the chicken (see Rob's marinara sauce recipe to make your own).

4. Add pepperoni, chopped spinach, olives, and 1 ounce of mozzarella to one side. Sprinkle with chopped basil, then fold another side over. Use toothpicks to hold the two sides
together. Top with additional marinara sauce, and sprinkle with mozzarella cheese.

5. Place chicken breasts in a baking dish and bake for 30-40 minutes at 375 degrees F until chicken is cooked through. Remove the toothpicks before serving.

830 Calories, 9 g Carbs, 137 g Protein, 27 g Fat
Servings: 3


Egg And Ham Cups

February 12th, 2019 by Debbie Martilotta

Ingredients
1 slice low-fat, nitrate free, deli ham
1 whole, farm fresh egg
2 tbsp organic, reduced fat cheddar cheese, shredded
1 slice, thin/small tomatoes, sliced

Directions
1. Preheat the oven to 375°F
2. Spray the cups of a muffin tin with nonstick cooking spray.
3. Press the sliced ham into the muffin tin cup, forming a ham cup.
4. Place the tomato slice in the cup.
5. Crack the egg and drop it in on top of the tomato. Repeat this process for as many cups as desired.
6. Place the muffin tin in the oven and bake for 10-15 minutes, or until the egg is almost cooked.
7. Top with cheese and bake for an additional 3-5 minutes, or until the cheese is melted.

Let cool for a few minutes. Once the cup has cooled, use a spatula to carefully transfer it to a plate.
Eat with your choice of carbs, such as a piece of fruit or low carb oats.

Courtesy of Jim Stoppani, Ph.D.


Stuffed Peppers

March 27th, 2018 by Debbie Martilotta

Ingredients:

6 red, green, or a mixture of colored peppers
1 pound extra lean ground beef
1 pkg. (5 links, hot or mild) turkey Italian sausage
1 cup diced onion
1 cup diced red pepper (tops of peppers)
4-6 tsp. olive oil for browning meat and veggies
Salt and Pepper to taste
1 cup spicy, low sugar, tomato sauce with basil
2 cups grated low-fat mozzarella cheese
1/2 cup grated Parmesan

Instructions:

  • Preheat oven to 375F.
  • Cut tops off peppers, making a deep enough cut that you have some pepper to chop for the filling.
  • Square off the bottom of each pepper to make them stand up.
  •  Clean out inside of peppers and wash if needed.
  • Choose a pan that will keep the peppers standing upright and spray with olive oil or nonstick spray.
  • Brown both beef and uncased turkey meat in small amount of oil, breaking up into small bits.
  • Drain cooked meat in a colander to remove fat.
  • Cook chopped peppers and onions for about 3-4 minutes.
  • Add about 1 cup tomato sauce, just enough to barely moisten the mixture. Season with salt and pepper to taste.
  • Let mixture cool slightly, then mix in cheeses, saving about 1/4 cup Mozzarella for the top of the peppers.
  • Put the peppers in the pan standing upright.
  • Stuff each pepper with meat/veggie/cheese mixture, using a large spoon and pressing in tightly until you use all the filling.
  • Put a pinch of Mozzarella cheese on the top of each pepper.
  • Cover the dish loosely with foil, tenting so it doesn’t touch the tops of the peppers.
  • Bake, covered with foil about 30 minutes.
  • Take off foil and bake 20 minutes more, until cheese is melted and the tops are slightly browned. Serve hot.

DBM Meatloaf

March 27th, 2018 by Debbie Martilotta

INGREDIENTS

2 lb Ground beef
1/2 cup Golden flaxseed meal (or almond flour)
1/2 large Onion (diced)
8 cloves Garlic (minced)
3 oz Tomato paste
2 tbsp Worcestershire sauce
2 large Egg
1 tbsp Italian seasoning
2 tsp Sea salt
1/2 tsp Black pepper
1/3 cup Ketchup (low sugar)

INSTRUCTIONS

  • Preheat the oven to 350 degrees F. Grease a 9×5″ loaf pan and set aside.
  • In a large bowl, combine all ingredients except ketchup. Mix together until well incorporated, but don’t overmix.
  • Transfer the mixture into the loaf pan. Bake for 30 minutes.
  • Spread the ketchup on top of the meatloaf (if using).
  • Return to the oven and bake for 25-45 more minutes, until cooked through and internal temperature reaches 160 degrees F. (Time will vary depending on the thickness of the loaf.)
  • Rest for 10 minutes before slicing. Cut carefully using a serrated bread knife.

Not all Calories are Created Equal

March 6th, 2018 by Debbie Martilotta

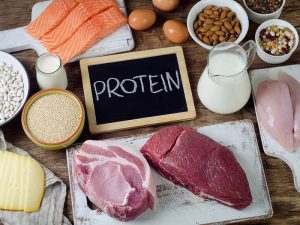
Calories are not the issue…where those calories come from IS!

For years we’ve been told that “a calorie is a calorie”. NOT SO! Eat lean protein (grass-fed, free-range, organic, wild-caught), good fat and complex carbs (from veggies) and you won’t have to worry about calories!

People who ate plenty of vegetables and whole foods lost significant amounts of weight over the course of the year without restricting the quantity of food that they consumed, according to a new study published in JAMA on Tuesday.

The study, led by Christopher D. Gardner, the director of nutrition studies at the Stanford Prevention Research Center, looked at 600 people who were split into two diet groups. One group ate low-carb food and the other followed a low-fat diet, The New York Times reports.

The original goal of the study was to compare how overweight and obese people handled each diet, but both groups were encouraged to choose better quality food over processed options. At the end of the year, both groups had lost a good deal of weight. The low-carb participants lost an average of 13 pounds, while the low-fat group lost an average of 11.7 pounds. Both groups also saw improvement in other health factors such as blood pressure and body fat.

The study suggests that health professionals should encourage people to avoid processed foods that have refined starches and added sugars such as white bread, bagels, and sugary snacks and instead focus on eating more high-quality food.

Researchers say that it’s not that calories don’t matter. Participants in both groups were eating less by the end of the study, but that calories shouldn’t be the main focus when it comes to weight loss.


Zucchini Enchiladas

February 19th, 2018 by Debbie Martilotta

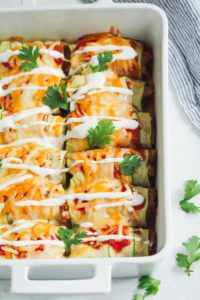
Amp up your veggie intake by using thin slices of Zucchini instead of tortillas to wrap your enchiladas.

  • 1 tbsp. extra-virgin olive oil
  • 1 large onion, chopped
  • kosher salt
  • 2 cloves garlic, minced
  • 2 tsp. ground cumin
  • 2 tsp. chili powder
  • 3 c. Shredded chicken
  • 1 1/3 c. red enchilada sauce, divided
  • 4 large zucchini, halved lengthwise
  • 1 c. Shredded Monterey Jack
  • 1 c. shredded Cheddar
  • Sour cream, for drizzling
  • Fresh cilantro, for garnish

Directions

  1. Preheat oven to 350º. In a large skillet over medium heat, heat oil. Add onion and season with salt. Cook until soft, 5 minutes, then add garlic, cumin and chili powder and stir until combined. Add shredded chicken and 1 cup enchilada sauce and stir until saucy.
  2. On a cutting board, use a Y-shaped vegetable peeler to make thin slices of zucchini. Lay out three, slightly overlapping, and place a spoonful of chicken mixture on top. Roll up and transfer to a baking dish. Repeat with remaining zucchini and chicken mixture.
  3. Spoon remaining 1/3 cup enchilada sauce over zucchini enchiladas and sprinkle with both cheeses.
  4. Bake until melty, 20 minutes.
  5. Garnish with sour cream and cilantro and serve.